Monday, March 30, 2009

Continuing on with the sub floor


Three sheets of ply last weekend and two to go. Tough part is, these last two sheets can't go down unil the holding tanks are all plumbed and ready to cover. My mom came up to help again by watching our two rug rats. Well, one rug rat and one in training.


Friday night Katie and I came down to get the plumbing tank plumbing done once and for all. We set the vent hose for the holding tank. It will travel across to the gray tank and connect to the vertical plumbing there.


We also used hose to plumb the shower drain. That is the second hose in this next photo.


A big concern of mine was preventing the the polyethylene tank from swelling up so large that it would push the rubber grommets down into the tank. I devised a plan to screw some blocks of wood to the bottom of the sub floor to prevent that from happening. Every once in a while I get a good idea.

We mounted all kinds of blocks to keep the tanks from wiggling around in their steel supports.


We took the time to get the black tank washer installed. It's a Tornado from Camco (I think). Too much silicone is never enough for this job.
An included hose will lead over to the valve area for leisurely cleaning.


Here's a side view of the offset flange we are using to plumb the toilet. Ideally, the toilet would basically sit centered on the frame. That is not possible for our design, so we've compromised with a slightly raised toilet (only 1/4" higher than original). We may be forced to move the bathroom wall laterally to make the toilet fit in it's new location. It sat on the outside of the frame before and inside now. Moving it in was a compromise for getting a black tank where there was no tank before. I think it's worth it.


Friday night finished up with high fives since all the tank plumbing was done.

Saturday started off with some good time techy fun. I had ordered a tank level gauge set and was ready to mount the holding tank sensors. After doing some research, I settled on the SeeLevel system from Garnet.

A Canadian made all digital system promises to give us a percentage reading of tank levels. 0% means the tanks is empty and 100% means it's time to dump. I ordered a system that will monitor three tanks (gray, black and fresh water), as well as DC voltage and propane tank level.

The three tank level sensors that came with the kit are all meant for tall tanks up to 12" tall. Both my tanks so far are short, so Garnet swapped the two 12" sensors for ones meant for short tanks.


Mounting them is the fun part!
Instructions say to measure the tank height.


Starting with a shorter sensor is more accurate than cutting a longer one down radically.


Cut the sensor about one square shorter than your tank height. Also cut off the tab that describes the tank. This one is for the gray tank.


Sensor self adheres to center of tanks tallest height. We added a layer of rubber to insulate the sensor from the steel cross member.


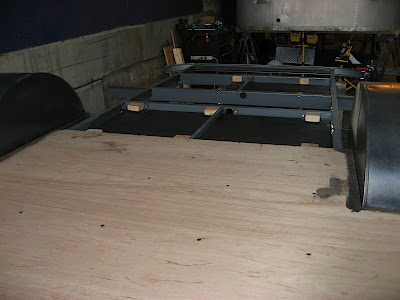
Tanks are (finally) plumbed, wired and ready for more insulation and cover.


We like visitors! Looks like Eva is telling Norm, "The campground is that way, Dad!".


Back to work and ready for cover.


Katie came back down in the afternoon to help with the remaining sheets. After a week of looking at these things, I was ready to get them locked down (and get Katie to do it).


Looks like we're drill ranchers.


Final bit of fun was covering the black tank. Stay warm down there little buddy!


Ryan (me) gets to finish the last two screws.


A break for dinning and back later on Saturday night for a work PARTY!

In a former life, Fred was a drywall taper. Handy skills to have for leveling the seams and filling screw holes. Here's a knife, Fred!


Expert work in a very short amount of time.


Katie and I lured Fred down with the promise of fresh home brewed beer. Katie is enjoying a pint of Kolsch
(and watching Fred work) that I made right after the new year.


All three of us worked to get the Marmoleum cut and rolled out to glue.


I spread out the glue (with little skill), we all laid the sheet down and Fred rolled it out. Katie's job was to make sure I didn't make any huge mistakes.
The few seams we have will be mostly covered by cabinets and the shower. Teamwork won the night and we are really happy with the results.


One growler of homebrew for three thirsty workers is not enough, so we all went to Prost! West Seattle for Beer & pretzels.


Sunday was a cleanup day and the day for Grandma to go home (Thanks a million, Mom!!!). Emmett watched as I used a router to straighten up the Marmoleum at the edge of the plywood. Then he helped me with the cleanup. Norm made a quick visit & helped determine the center line of the trailerAfter, I worked to get the C channel measured out & screwed down.


That's plenty of work for one weekend. Feels like we took a really big jump forward this weekend. During the week, I hope to get angle brackets set at the door. And elevator bolts around the perimeter. If time allows, get some insulation in place on the belly. Rumor has it my Dad is coming this weekend. Work seems to happen much more rapidly with him around, so I'd better get my rest. The belly skin could get fastened in place and maybe get the shell reunited with frame. Stay tuned.... (and leave some comments!)


Thursday, March 26, 2009

Laying the deck

Saturday morning started with my muscle boy Emmett. E and I came down to start getting the sub floor mounted.


After so much repetition on previous projects, I for one was ready for some variety. Great attitude to have for the weekend, since there was so much to learn and do. Able helper, Starbucks at my beckon and no rain. What could be better?

The first project was to get some rigid insulation cut and mounted just below the sub floor and above where the spare tire is to ride. We laid the insulation on top of the frame and used a marking pen to trace our cuts. Keeping the insulation snug, it will stay in place until we cut and screw a piece of aluminum to the bottom.


I also decided to give a vapor barrier between the steel frame and plywood sub floor. I bought some foam meant to go under a sill plate and above a concrete foundation wall. It was 5 1/2" wide, so we cut widths that worked better for the frame. Tracing the pattern of the frame on the bottom of the ply, we stapled the insulation in place while placing the sheets in place.


Once the sheet was centered and all the sheets fit well back to the wheel wells, it was time to drill and screw the plywood to frame. We used a 1/4" self tapping deck screw. It is a four part drilling process: pilot drill, countersink taper, drill to size and drive the screw. Worth it, because they feel really solid when in place. We used the same amount of screws that Airstream used to bolt it down originally. I bought 100 screws and I think I'll need more before were through.

To keep the sheets solid on the joints, we decided to biscuit join and glue.


My expert biscuit technician was up for the job.


First sheet was slow because of the spare tire and setup time. Second sheet was slow because of the step and aluminum that protects the underside of the plywood there.


Slow, but exciting. To be working on projects that don't involve mouse turds and mildew in the air. Or wearing a respirator because of paint fumes. Getting to take breaks to have tickle battles with Emmett.

Third sheet was plenty slow since it was time to reintroduce the fenders to the frame. I had spent the time to clean them up and spray them with POR 15.


Next is to cut new insulation and get them measured into place. Once that is done, the third sheet can get glued in and bolted down.


Showing progress....


Katie came down with the big boss, Leon. Boss said it's time for lunch.


The last two sheets were fitted by myself and Norm with the fenders bolted temporarily in place. We moved the sheets in and out of position and trimmed the plywood until the sheets fit well. Setting them aside, it is time to fabricate the mounts for the holding tanks.


We have two waste tanks in this trailer. The black tank is 18 gallons and the gray tank is 32 gallons. I decided to use steel straps bolted the frame members to hold it in place. The frame was prepped to hold the tanks fairly closely, so I need to keep them from falling to the ground. The black tank is to get two 1/8" x 1 1/4" straps and the gray tank will get three.

I'm not much of a smithy. A torch and hammer is about all I know about bending steel. Worked out well enough this time. First, I cut the straps to equal length for each tank and marked them for the width of the tank.


Next, I clamped them to a block of wood and heated them up.


Then I beat on them with a hammer (my favorite part) to get them just so.


Not looking too bad...


Used the floor jack and some bungee cords to hold the tanks in place to mark the brackets and get them drilled and bolted in place.


This part took some real hours. Fun to see it all coming together finally.


Nice and tight to the belly. Both hang below the frame by about 4" at most. Should have about 12" from the ground to the bottom of the tanks. Maybe 10" at the low part of the drain pipe.


That was all I could handle for one weekend. Found a whole array of muscles I don't normally use. Not to mention sore shins and knees from leaning against the frame.


Next up is to drill holes in the tanks for vents and inlets. Also need to settle on getting the black tank vented and shower pan drained into the gray tank. Fun!


Monday, March 23, 2009

Hurry up and get this frame painted!

'Honey, does it smell like paint in here?'


I must say, POR 15 is one nasty paint. It eats rust and your lungs if you let it. I was fully safe while spraying with my big 'ol respirator on.

The next morning, the dust had cleared and paint had tacked over enough for a second coat.


After the second coat of POR 15, I had time to clean all the paint gear and get ready for the top coat.


I bought a pint of speckley silver paint from the auto paint store to coat all the steel pieces seen when the shell is back on. I've got to send some karma to Katie for bagging up the chains in latex gloves. I would have spent thirty minutes masking the chains. She had 'em wrapped up in two.


Accessories....


Glad this one's done. I rapidly came down with the flu minutes after getting my stuff put away on that Sunday. Not sure if it was fumes during the clean up phase of the weekend or what, but I will wear the respirator during all the clean up etc. next time I work with any of that stuff. Who wants to be sick?